Beware ! You're in Kamikazie here. Not many pro luthiers around, more often brave souls experimenting in their kitchen.
Lyra parlor guitar repair project - First experience by Zhyla
Bridge work - Neck Reset - Refret
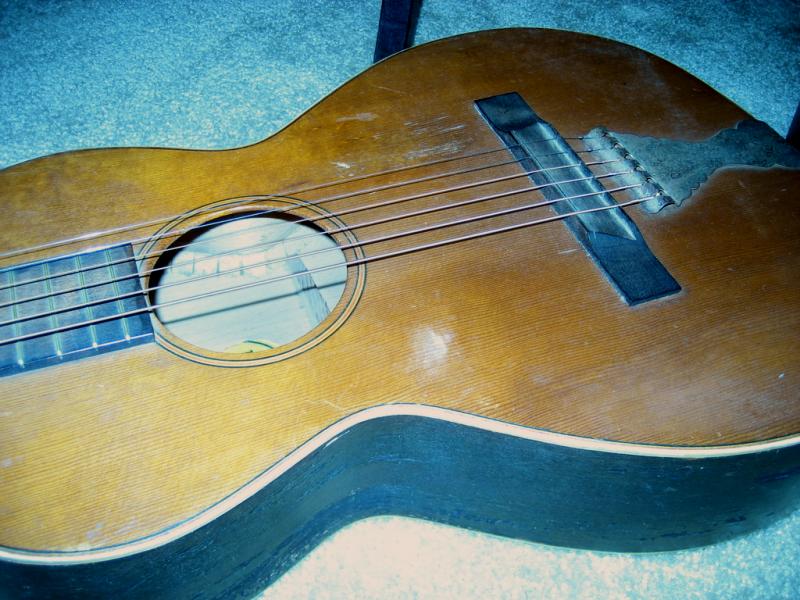
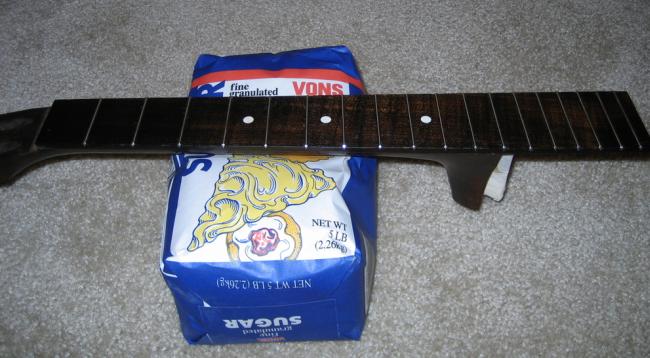
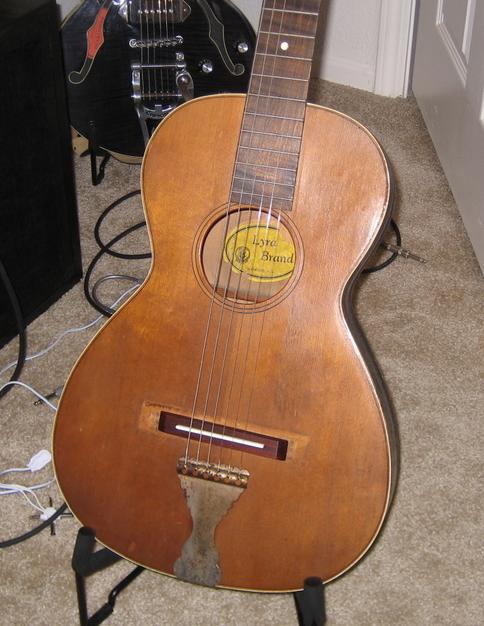
Zhyla : What $50 will buy you on ebay these days...
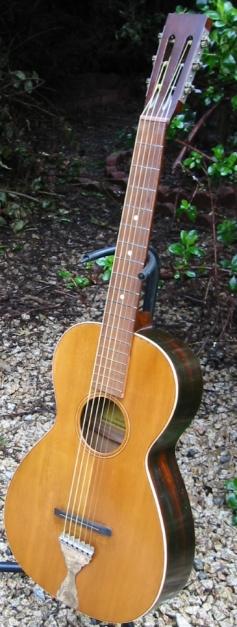
I found what I think is the exact same guitar, and that link identifies it as a Lyra-branded, Bruno-distributed, Oscar Schmidt-made parlor guitar from the 20's. Here's what it "should" look like :
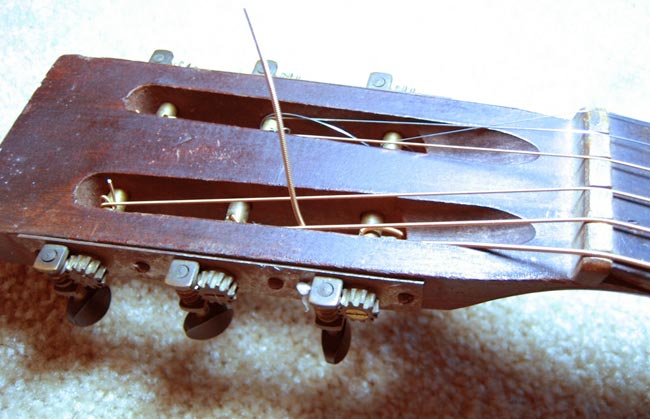
Anyways, spruce top and painted birch (I think) back/sides. The tuning keys are a mysterious substance and they look untouched by time. Ebony? Plastic? Help me out here guys.
Clearly the bridge is not original. My quick assessment is it needs:
neck reset
plane the fingerboard + refret
new nut, or at least some work/shimming on the old one
new bridge, hopefully I can make this myself from a rosewood blank
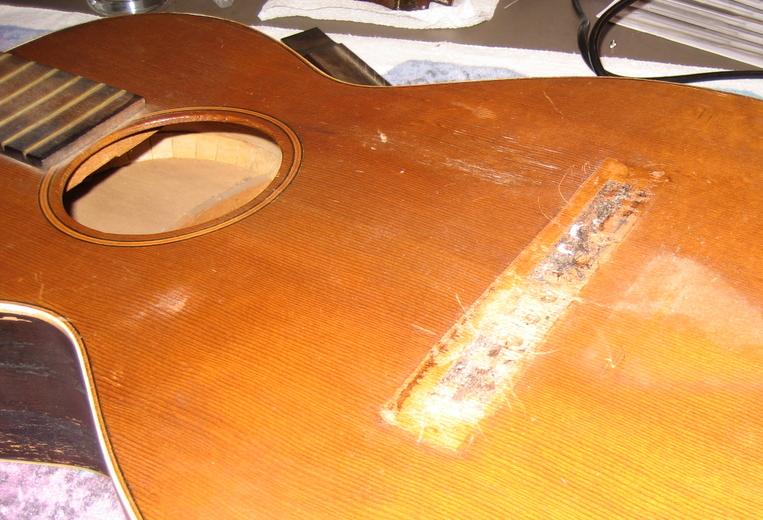
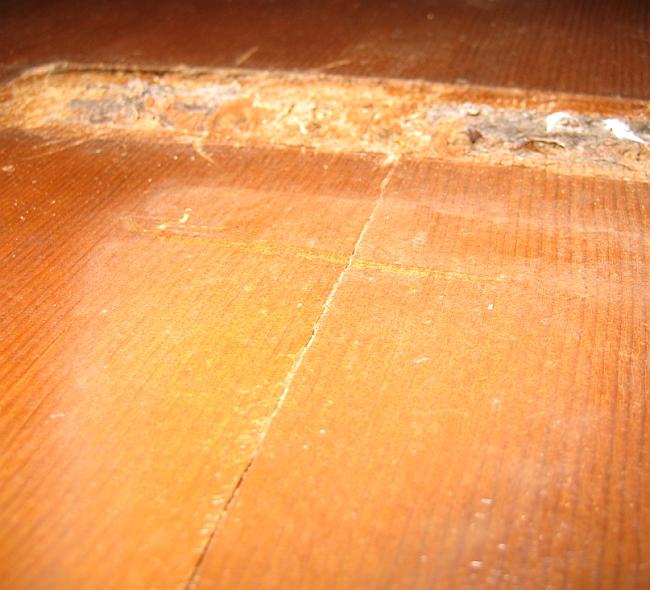
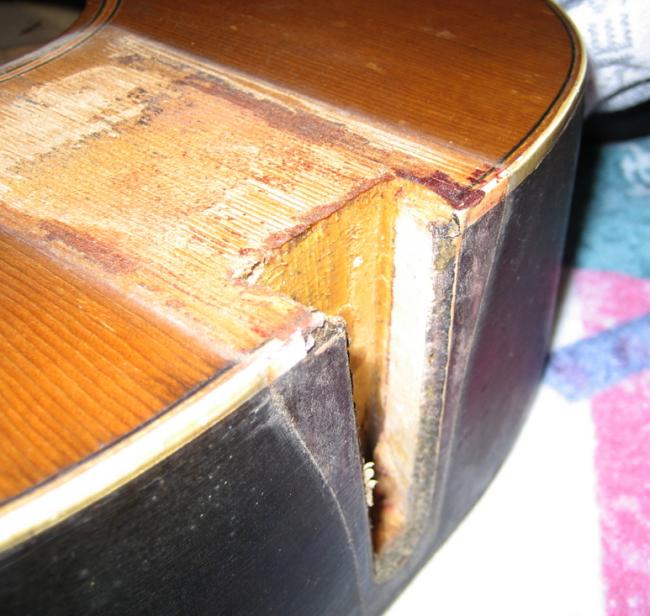
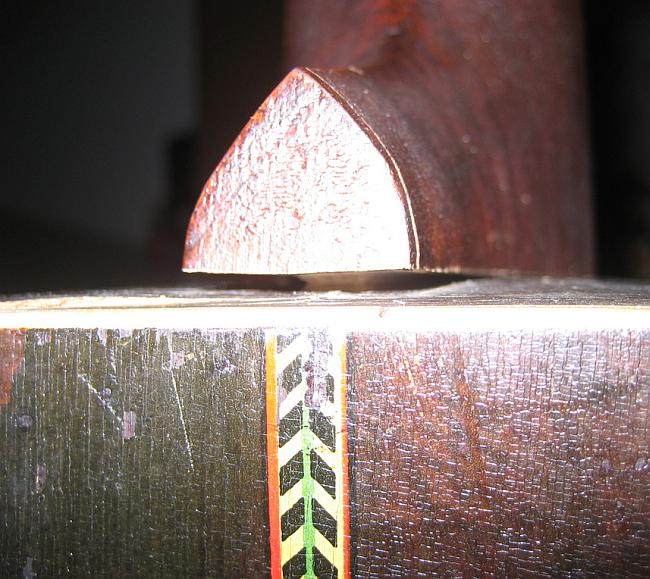
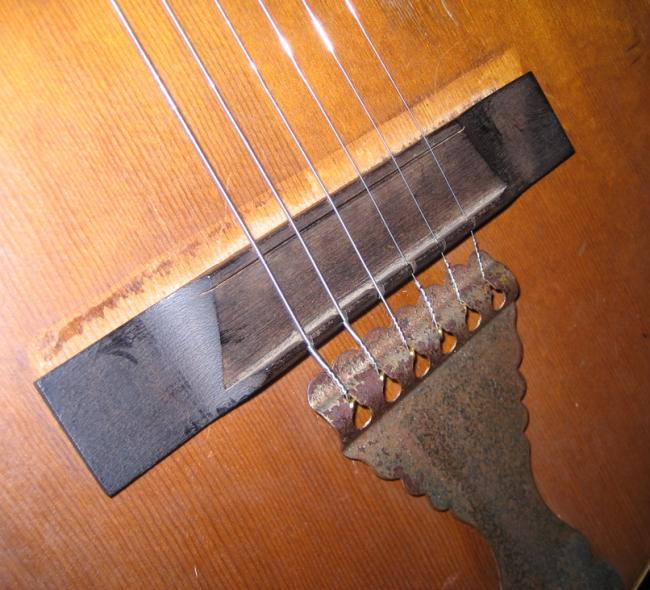
Poking around on the inside I noticed 6 holes in the top underneath the bridge. Removing the world's weirdest bridge revealed the ugly truth :
At some point someone installed a bridge plate and attempted to string this like a "normal" flattop. This resulted in some string chewage at the string holes and split the top from tail to bridge. There isn't any bracing between the bridge and the tail so the extra tension on the bass side pulled the top up on that side and cracked it. At least this my hypothesis.
The seller didn't mention the split in the top but since the point of this guitar was to get my hands dirty I don't think I'm going to make a fuss.
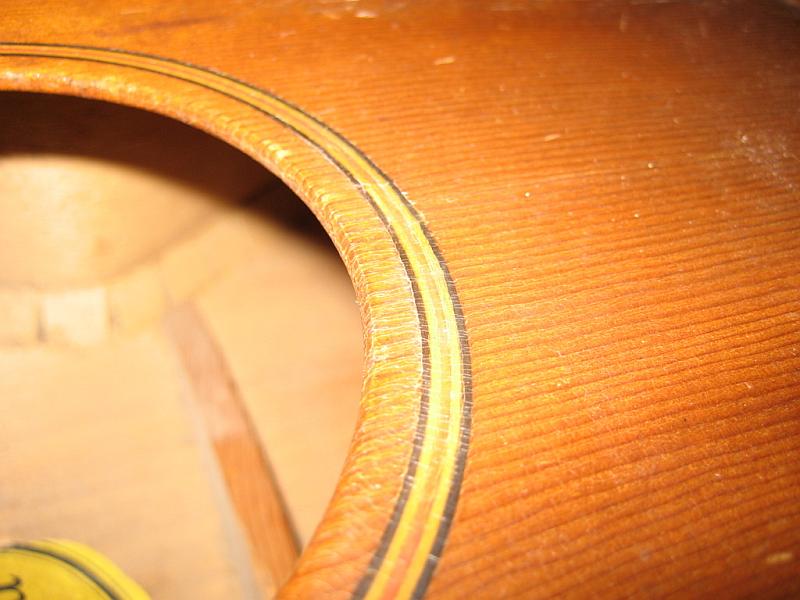
My current thinking is to fabricate a simple floating bridge, sand the top smooth, fill the holes with something (pine dowels?), and refinish (lacquer?). I'm hoping the bridge ends up being over the top of the holes and obscures it. This would be nuts except it looks like all the detail work on the top is wood inlay:
I hope that can take a light sanding without discoloration. Now to get that neck off!
François : Thanks for these work in progress photos... I'd say you're on the right way... These wood inlays should be sandable a bit, you even may find a nicer color to it after a light sand work..
rlspt : what fun! i love digging around in an old guitar.
it's possible this one was born with a pin bridge and the tailpiece was added when the bridge was changed.
thanks for the pics, keep us posted.
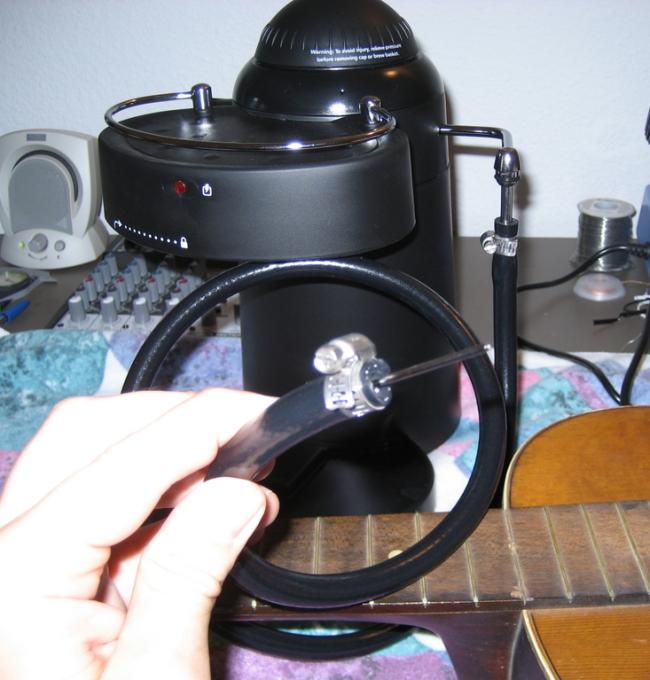
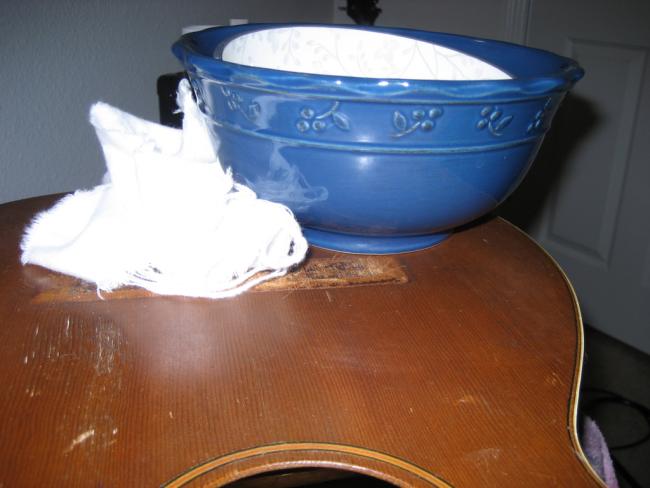
Zhyla : Went to Target and Home Depot and got myself set up for removing necks:
Just following the stuff I've seen on frets.com, drill a hole in the 15th (or 12th, in the case) fret and insert a steam needle. The heat and moisture weakens the neck joint.
Oooopss.. Note from webmaster to readers : please read further below, it looks the 12th was the WRONG fret, should have been the 13th !
I wasn't exactly sure where to put the hole in that fret or how deep to make it. I still don't know. So I let that go for a little while. The neck didn't seem noticeably looser but I started pressing on the heal, trying to force the neck off with my hands. There's jigs for this sort of thing but I don't have one. It didn't feel like anything gave but I noticed a gap between fingerboard and top. Pushed some more and the gap got a wee bit bigger.
So then I put it down on the floor, put a block of wood under the heal and push with my hands on the top a bit. Very much like the jigs you can buy if you think of it. And...
Not bad for my first neck removal. Though I did have a scare. The hose I bought is not suited to high temperature or pressure. About 2 minutes into the steaming process the steam punched a hole in the hose. Semi-dangerous, I'm wearing goggles from now on. I wrapped a sock around it and started it up again. I couldn't find the correct kind of hose at the hardware stores - an auto parts store might be a better bet.
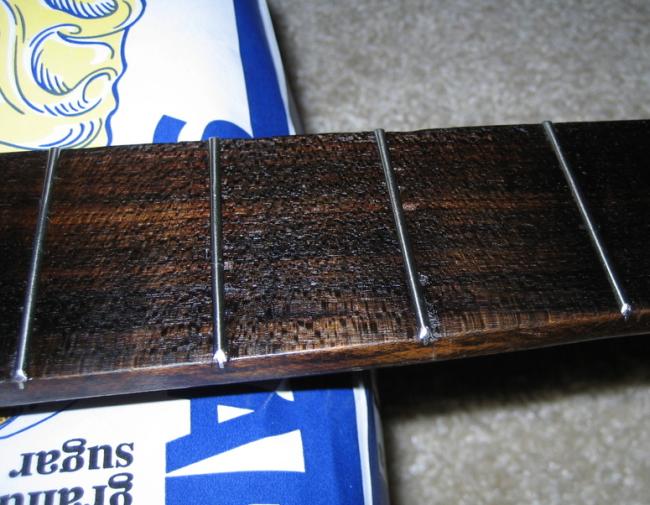
I'm in the process of defretting the fingerboard so I can start the refret. The fingerboard appears to be walnut. Whatever it is, it's dark all the way thru, not like stained maple. It looked terrible originally but I just oiled it up and I'm now kind of a fan. It's VERY dry and brittle. I pulled a couple frets and flaked off quite a bit around the fret slots, so I oiled it up in hopes it wouldn't flake anymore.
I've also been looking at the bracing. None of the braces are loose, but 2 out of 4 of the back braces don't fit very well. There's only 2 braces on the top, one above and below the soundhole. There's also a bridge plate beneath where the fixed bridge was, but nothing between that and the tailpiece. I think this is why the top split in that region, it was too lightly braced for a fixed bridge.
It isn't clear to me what back braces really do so I'm not sure whether I should fix them. I'm trying to get good pictures of them but the idea is that they're firmly glued in the middle but on the ends there are big gaps. Like you would expect if you flattened an arched back. Weird.
François : Thanks for the excellent report zhyla !
I bought a needle perhaps 2 years ago now, but I still have to do the same job, about 8 guitars awaiting... So this experience is precious !
Did you drilled the right fret ? I had understood it differently : the needle/steam is supposed to go in the glue joint, ie one fret after the neck joint the body.. 15th fret on a 14 fret neck, and I think I would have drilled the 13th on your 12 frets neck... ?
The depth of the hole should bring steam in the middle of the joint, so about 2 inches I'd say ?
I tend to believe your guitar had a pin bridge from origin. The presence of a plate under the bridge says so. If someone had done a bad "bridging" job, they would have made it without a plate under the top... The guitar with a floating bridge don't have a plate there. How does it look (this plate) ? Does the glueing look original ?
The separation in the two pieces top, between bridge and tail, is not due to the pined bridge or string tension. It's a common failure on many guitars, with or without floating bridge.
A guitar with a pined bridge doesn't have any more braces under the top, nothing between the tail and bridge. I may be wrong, please correct me, but I think the only difference under the top is the bridge plate.
Your braces unglued at the end looks exactly, as you said, as if the arched back went back to flat... Most backs had a moderate arch. Reglueing them, one at a time, with the right clamps, should bring back the arch... Not that easy..
About the "black" fingerboard, I read somewhere the "ebonization" process at Harmony's wasn't only some stain on surface. They had a chimical treatment to make the wood dark in depth.
Zhyla : Hmmm. It looks like if I'd drilled the 13th fret I would have drilled into the neck block and missed the joint completely. I think it's mostly luck that any steam got into any part of the joint. Probably just heating the whole thing up would achieve the same result.
I'm undecided about the original bridge idea. Clearly the guitar has been worked on at one time (reglued bracing, patched crack in the back). I think the strongest evidence for this being a floating bridge originally is the picture that appears to be the same guitar, with the same markings and inlay, with the same tailpiece. I'm not sure but that's my best guess.
Right now my plan is to construct a floating bridge, patch the holes, and refinish the top. The back, sides, and neck could all use a refinish but I have no idea how to recreate the faux-rosewood pattern. I wasn't really trying to get into a restoration project here so I will probably just do the top and hope it eventually looks worn out to match.
Fingerboard... your guess is as good as mine but I don't think there's any process to turn wood colors that deep into the wood. Whatever it is, it's very brittle. I got it defretted since the last post and have attempted to glue down some of the larger pieces. Next up is sanding it... it's mostly straight but the edges of the fingerboard curved up ("negative" radius - can't think of a better word). Very strange. I have no idea if it had a radius originally but it's going to be flat when I'm done with it I think.
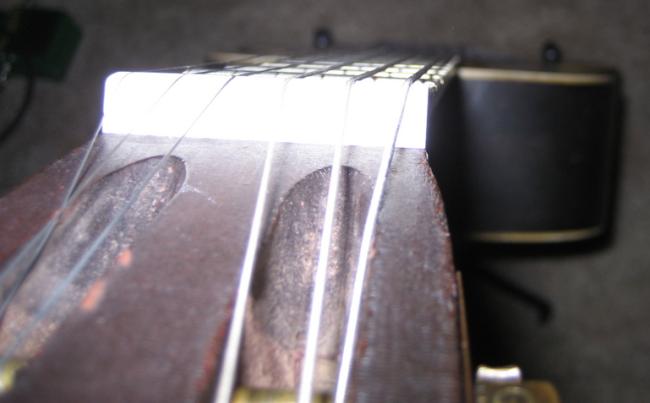
Another peculiarity - the white fret markers. Any idea what they are? They've shrunken in a bit. They look dirty and sand back to a brighter white. Bone? Ivory ? Funny plastic ?
rlspt : kamikaze luthiery! i love it. i agree with francois on all counts here. the hole drilled should be aimed at the fret where the end of the neck dovetail meets the neck block. when you drill, you should be able to feel the bit go into the slim void between the two pieces: less resistance there than drilling into solid wood. i start with a tiny bit, smaller than the steam needle, and sometimes drill at varying angles until i find that void, then go to a bigger bit to fit the needle in.
i also think the guitar originally had a pin bridge, and that the braces are loose on the ends because of flattening of the original slight arch. at this point i'd bend/clamp the braces to fit the current contour of the back and top, not try to restore the arch.
francois' bridge plate analysis sounds right too, i doubt there was any brace between the bridge and the butt block.
i'd guess the fretboard was flat to begin with, with no radius, typical of less expensive model.
ebonization varied- some light-colored woods will react to exposure to ammonia fumes by darkening, and depending on the strength of the fumes and time, the color can go pretty deep into the wood. some ebonized wood just had dark stain applied. or maybe in this case they used a dark wood. hard to tell.
i'd guess the fret markers are celluloid, the dark and dirty look going to white with sanding sounds right for that.
thanks, keep posting, this is interesting and educational for all of us kamikazes.
billieg2 : What is that steam machine you bought? How much and where? Also, an auto parts store will have heater hose which will take the pressure and temp. Good job on the pics!
Zhyla : My "steam machine" is a Mr. Coffee espresso machine. Target, $30 USD.
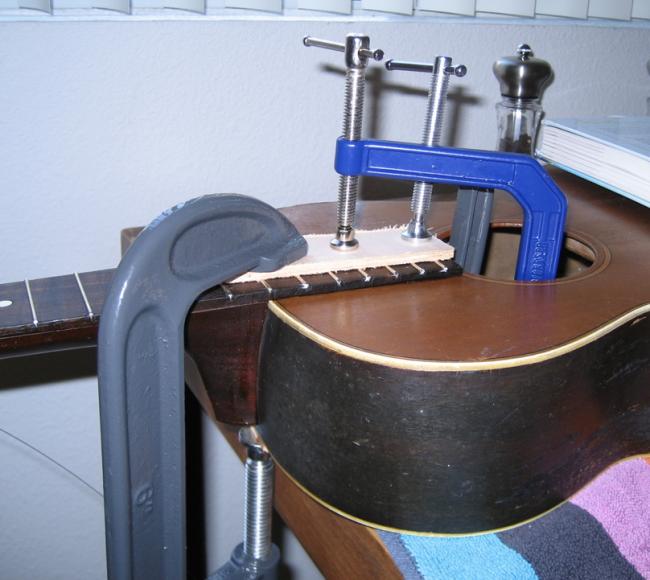
Today's progress... glued and patched the split in the top. Took a piece of spruce and dremeled it down to a thin, tapered piece to use as a patch/brace:
Then I forced glue up into that crack from the inside and stuck the patch over the crack on the inside. Then I clamped it with some gnarly magnets and a little bit of weight on the raised side:
Yeah, not sure how well this is going to turn out. Would have liked to get more clamping force on the patch but I couldn't put the magnets any closer together or they stick to each other.
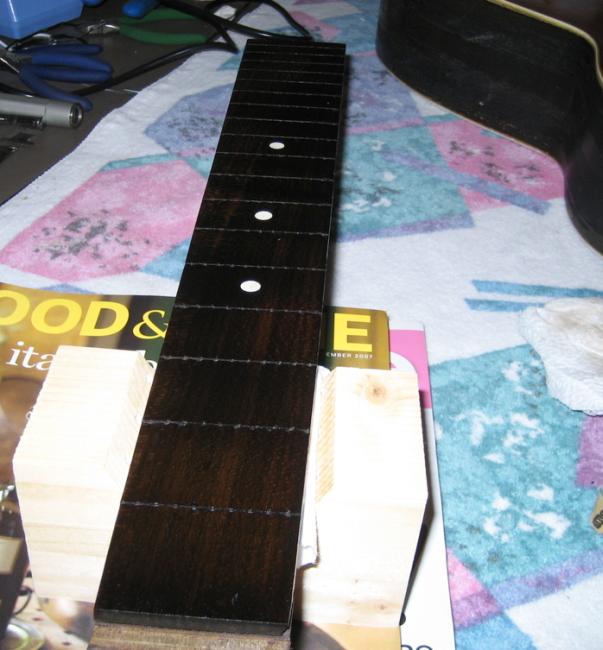
Also got the fretboard sanded flat and smooth (100, 220, 320 grits, 0000 steel wool). I think it's ready for the frets when they arrive. May need to deepen the slots for the new frets.
There was quite a bit of damage to the fretboard done during the defretting. I've decided not to worry about it until the frets are in.
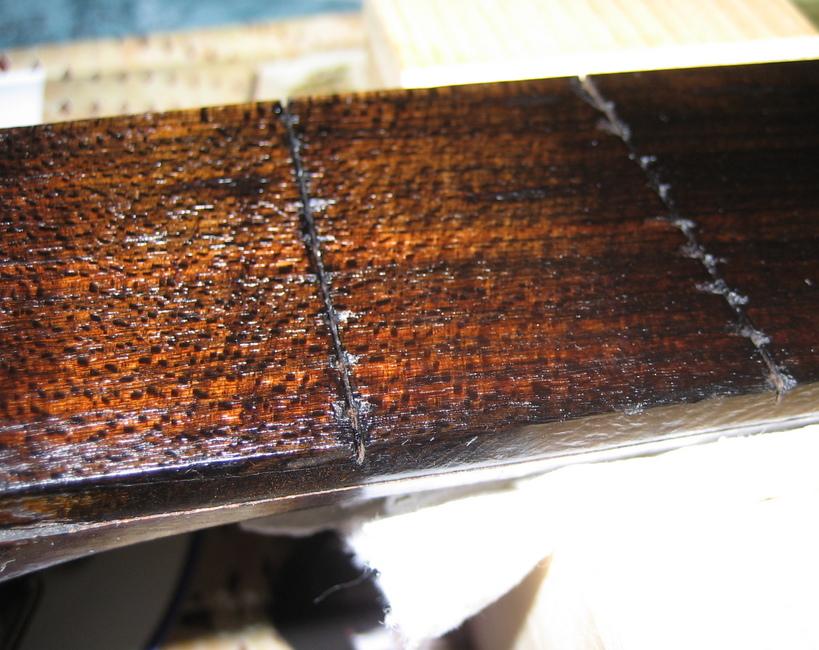
Now as to that fretboard material...
I'm not a wood guy to be honest. It's got a weird irregular grain to it. It would look better if it were stained like the original surface was. I kind of like it though.
François : From the close-up on the neck, all these small dark spots, doesn't it look like mahogany ?...
Snapcase : It looks beech to me. This wood was widely used in european cheapos for stained fretboards. It has this particular dotted grain.
Don't forget Schmidt was one of the many german inmigrant luthiers. He made some fine guitars, but most of his production were affordable but nice sounding instruments with a way lower construction quality level than what we can find in Martin, Washburn, Weymann, Larson, Bauer, Bohmann, Ashborn... You won't find anything but ebony or rosewood fretboards in any of those instruments. Stained fretboards were common in Schmidt's Stellas, Sovereigns, Sterlings or Lyras
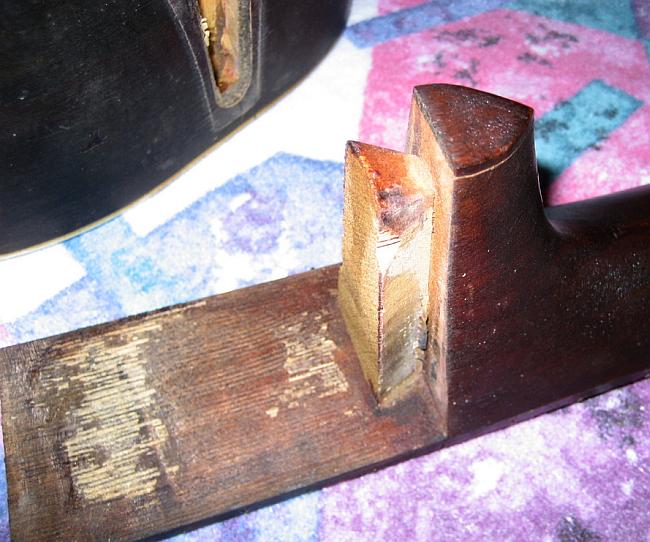
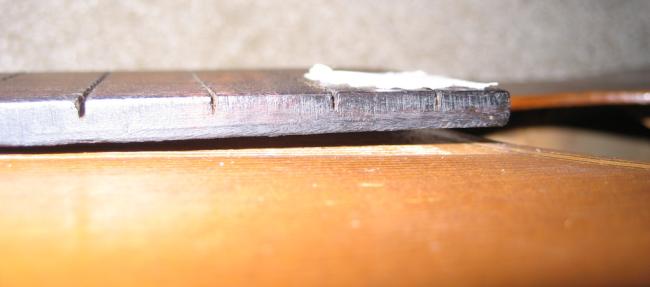
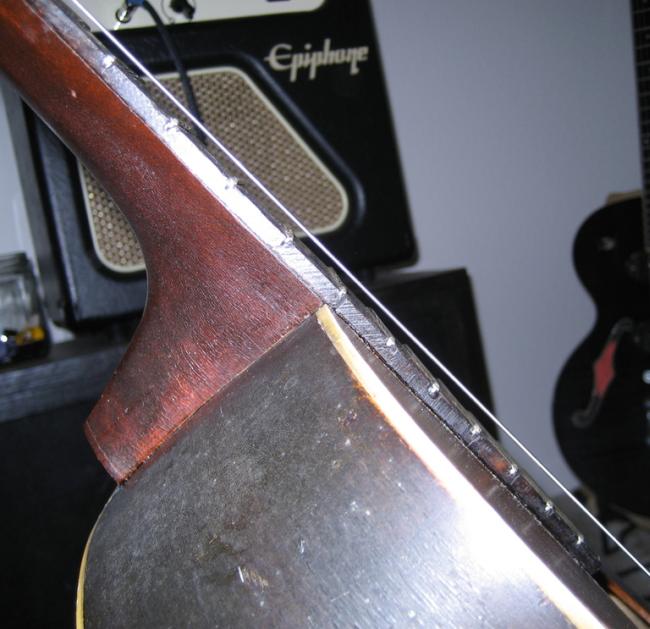
Zhyla : Last few days I've been working on the neck joint - the actual neck reset business. Here's where I'm at so far.
There you can see how much heel material I've removed.
There's my fingerboard line projected onto the bridge. Doesn't look good, but considering this thing had about 3/4" of string action at the 12th fret when I got it this is definitely progress.
There's my predicament. The fingerboard now no longer lays down on the soundboard. I can glue it down but if I reset the neck anymore I don't think I'll be able to. It also warps up a bit on the bass side. It's stiff enough to just leave floating out there. The reason this is such a problem is the soundboard slopes down from the neck joint to the soundhole. I'm not sure that's correctable, it looks like the whole guitar kinda caved in on itself a little bit. This is probably as bad as neck resets get.
Now with the good news. I put in some temporary shims in the neck joint (masking tape) and strung this thing up. This was the first time I was able to string it up since before it looked like the neck was going to snap. I am completely amazed at the sound. Way louder than I expected.
I got my new frets today, I think I'm going to start fretting as soon as I finish this post. I also started shaping a new nut.
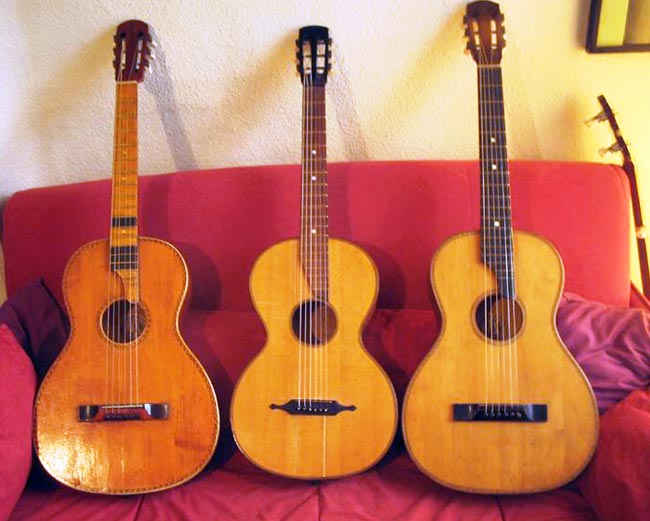
Snapcase : ("I am completely amazed at the sound" )Hehehe... This is the typical reaction with old parlors. They are usually lightly built and highly resonant. For those used to big bodies it's always a surprise.
One of the loudest guitars I've ever had is this tiny old parlor made by Jacob Birhl (or something like that). You won't believe how loud and alive it sounds. It's the one in the center flanked by two 00-sized parlors as a reference
(>>>"The fingerboard now no longer lays down on the soundboard")
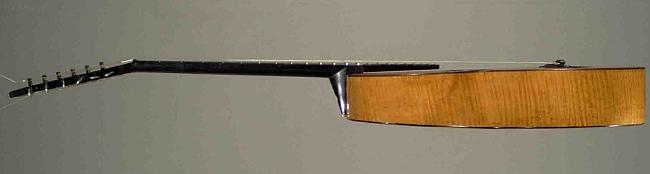
Don't worry too much about it. The most open sounding flat-top guitars I own have floating fretboards. It's not a common feature but Stauffers, Early Martins, Howe-Orme and some european luthiers and brands favoured it. I have a few Otwins with floating fretboards and they resonate like no other. If the neck joint in your Schmidt is strong, don't worry about that. Sound improves this way and fretboard end won't push top down anymore. Glued fretboards pressing down due to shifted necks are frequently responsible of top cracks in this area in old flat-tops.
Here go some examples of this technique:
This a mid 19th century Stauffer
And this is my mid sixties Otwin No. 72
P.S. PS: Hammer your frets before glueing the neck in. The fretboard end won't stand hammering.
François : Great pictures, thanks to both of you :)
Zhyla, you mean you strung it and played before glueing back the neck ? ???
I think I would shape a piece of hardwood to glue under the fretboard end. Perhaps not on the whole length, let's say one third of the fretboard extension, to have a better joint with the wood block inside. That's more or less how they did it on higher end Harmony archtops..
Zhyla : François, yep, I strung it up to a couple steps short of standard. There isn't really any force pulling the neck out of the joint if you think about it.
Got the frets in today.
Got a few scratches into the fingerboard in the process of finishing the ends of the frets, especially on the side of the fingerboard. Other than that it went pretty well. Hard to believe a local shop wanted $200 to do a refret.
I will say that the wood used on the fingerboard (beech? walnut?) is kind of a pain to work with. Scratches and chips too easy. It sucks to be hammering a fret in and see a chip fly off of another part of the fingerboard just from the vibration. I should have soaked this thing in mineral oil for a couple days before I even touched it.
Well, more work on the neck joint and slotting the nut and she's gonna be a player again.
This weekend I made a wee bit of progress. Got the nut shaped and slotted and the neck set.
24 hours later...
It's completely playable except for some buzzing at the 12th fret. Also the nut is a tad high, need to bring it down just a smidge.
The neck joint is completely solid but as you can see there's a small gap there. I got a little too kamikaze you might say. Next time I need to be more careful about the fit of the heel to the body and also shim it tighter. But it won't be going anywhere anytime soon.
I could really appreciate some feedback on the sound. Is that what it's supposed to sound like? I like the bass response but something is wrong with the treble strings. Like it half reverberates and half buzzes. Not sure much of that came thru in the recordings. Be brutal, I'm thick skinned. Anyways I don't like the sound of it strummed but fingerpicking sounds not too bad.
I'm 90% sure the bridge is holding back the sound. It doesn't hold the strings where they need to be and they move around when I bend. They're probably moving around when the string vibrates too. Can't get the intonation right either, the bridge needs to move farther south but can't because of the tailpiece.
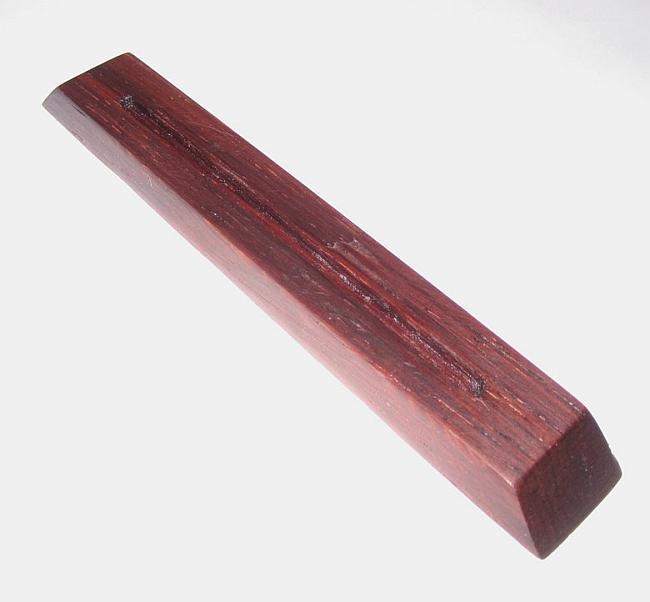
I'm going to try to make a new floating bridge next, hopefully. I have a block of rosewood and a bone saddle blank, what could go wrong?
François : This bridge looks and sounds wrong...
The angle at the "saddle" looks not sharp enough. Are you far from the right intonation on the picture above ? Could it be possible to have the right intonation with a pined bridge at the position where it was ? Could this confirm the pined bridge was original
?
Zhyla : The picture shows it as close to the correct intonation as I can get it. It needs to shift about 1/8" towards the tail. Judging from the pin holes the pin bridge that was installed wasn't even close to the right intonation, but that's just a guess since I don't know how thick it was. Also, perhaps the pin bridge intonation was good before the structural issues appeared, the body is a bit shorter than it was when constructed I am sure.
Is there a difference in tail blocks between tailpiece and pin bridge guitars? There's a big beefy tail block in this guitar. Seems unnecessary to me if it were a pin bridge. But I don't have any experience in this or anything to compare it to.
François : No, I believe there is really no difference inside... Apart, sometimes, a plate under the pined bridge, thin and larger than the bridge
Zhyla : Made a floating bridge today...
Definitely improved the sound. That funny jangly sound is 90% gone; hopefully some new strings will make this a good strummer. Luckily the bridge covers up the pin holes in the top.
Rosewood is a lot of fun to work with. Bone on the other hand... yuck.
I still need to bring the saddle down a little to get the action right. And I need to round off and polish the saddle edge. And i need to deep the high E string's nut slot a bit. But it's getting close being a decent player.
My remaining problem here is that the neck is not quite pointing at the tailpiece, so the strings aren't quite parallel with the neck. You can kind of see this in the picture above. I didn't really notice this until I strung it up with the floating bridge. It's still playable but I wish I'd fixed that before I set the neck. I think I'll leave it be and move onto my archtops.
Alright, here's a recording with the new bridge and new strings.
What do you guys think? Of the sound, not my mediocre playing :). I'm more or less happy with the sound.
There's a bit more setup work to be done but for the purposes of this repair thread I'm gonna call it done. What a fun little project, from completely unplayable to not a bad sounding instrument. Thanks for all the help from you guys.
k1w1 : Worked for me, sounds great Zhyla nice work :) :) been following your thread, I plan to jump in on my H950 once I can get a steam source....be referencing this
billieg2 : Sounds great to me. You saved another one! Good going.. :)
Snapcase : It sounds sweet, Zhyla. :)
I think it will benefit of lightening the bridge a bit, it seems a bit too chuncky.
Zhyla : Ok, I thought I was done here. Once I started playing some heavily muted blues I noticed a funny buzz. It disappears when I press on the back so I started eyeballing the braces. As mentioned earlier in this thread, it appears the back was originally arched but over time shrank a bit so now the back braces only contact in the center.
I wiggled on the middle brace a bit and pulled it out. Strung it up again and the buzz is gone! I'm going to flatten it out and glue it back in. My question is this: what purpose do the back braces serve? I don't get it at all. Do they keep the back from resonating as much at low frequencies?
Snapcase : They work in two ways. The first one is giving structural support for the back and the other role is controling the back tonal response. Mainly keeping bass end under control.
Zhyla : Well I made a messy job of it but the brace is back on and it sounds much better now. I should probably do the same for the brace on the lower bout, it's also poorly attached.
(some months later) normemail : Hiya!
The 13th fret would have been the one to drill through- that puts the steam needle into the void between the butt of the dovetail and the face of the dovetail mortise in the block. As far as steam goes, I've found that most coffee/espresso makers just don't get hot enough..... there's steam, and then there's STEAM! A pressure cooker does a much better job. If you get the temp up to about 250 F and keep it there untill the needle stops spitting and there's a steady release of vapor there will be more heat and less moisture introduced to the joint and it will come apart quicker and cleaner with less risk of finish damage.
Regarding hoses, automotive fuel injection hose withstands the heat and pressure well. properly sized (1/4" ID) with a wood or plastic handle supporting a needle that's 1/16" OD on one end and 1/4" OD on the other end works quite nicely. good hobby shops carry brass tubing that will do the trick. You can simply get sizes that telescope together to reduce the 14" tube to 1/16", soldering them together. A good clamp on the hose will keep things together.
If anyone is interested, I can make these things up easily. I can actually make up steam needles a bit thinner than 1/16" (Stainless steel hypodermic needle tubes) and would be happy to do so.